Get ideas & inspirations delivered to your inbox. You won't want to miss a thing, so subscribe free to the Blog Feed or sign up for Free Email Updates on the latest projects, shop news, blog tutorials & more. Check out the Project Gallery, Garden, Recipes & Inspirations tabs above, to see what you have missed. Browse through the sidebar for this week's Popular Posts!
**Please note: Some links may be broken, if this happens, please let me know which post & search for the title of a post on the search tab on the right while I work on fixing the problem.---->

Celebrate Easter with Peeps


Happy St. Patrick's day y'all!  For today's post, I will be sharing some of our ideas for the coming Easter.  This Easter season we will be celebrating our festivities with Easter baskets filled with Peeps & Company goodies along with some reading books.


PEEPS & COMPANY® was sweet enough to send me several items and treats to share with you and others, such as PEEPS® earbuds, luggage tag, Orange Delight Flavored Marshmallow Dipped in Orange Fudge,  Marshmallow Bunnies, Decorated Eggs, Party Cake Flavored Marshmallow Chicks, Sour Watermelon Flavored Marshmallow Chicks, Chocolate Mousse Flavored Marshmallow Bunnies,  Chocolate Covered Marshmallow Chicks, Rainbow Pop, • MIKE AND IKE® Easter Treats,• MIKE AND IKE® Jellybeans & HOT TAMALES® Jellybeans.  Peeps & Company also has many other items that are not candy, they have beach balls, socks, luggage tags, pillows and so much more.


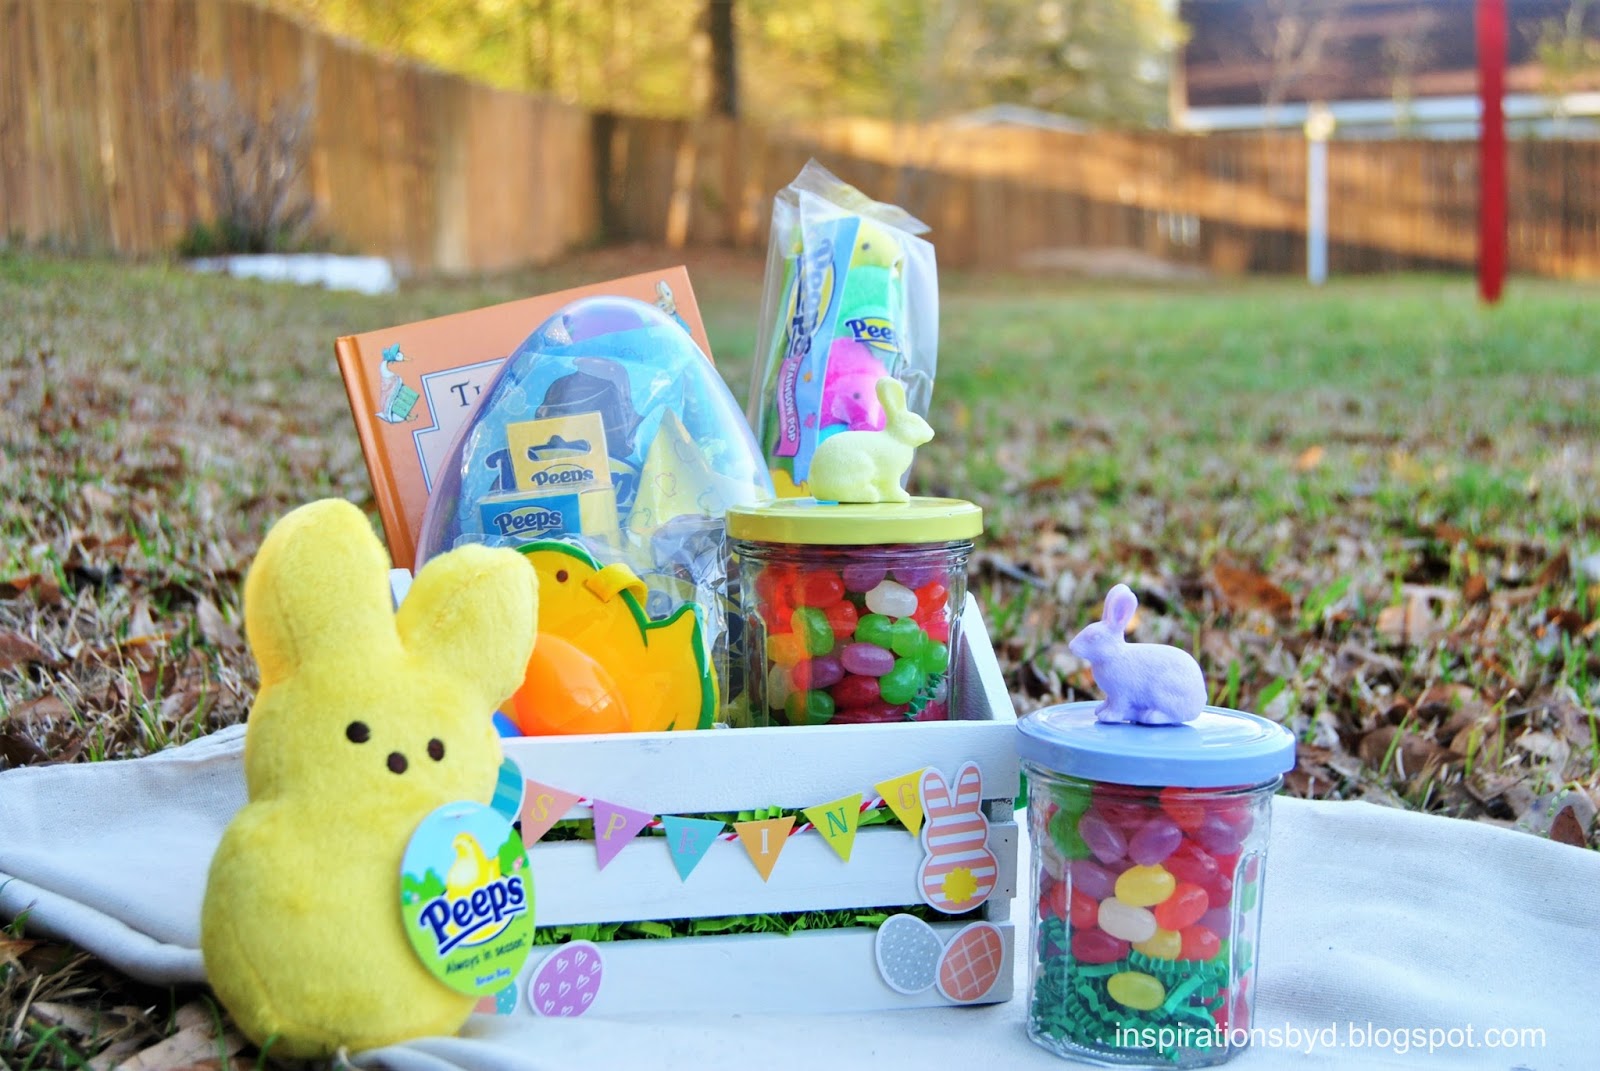
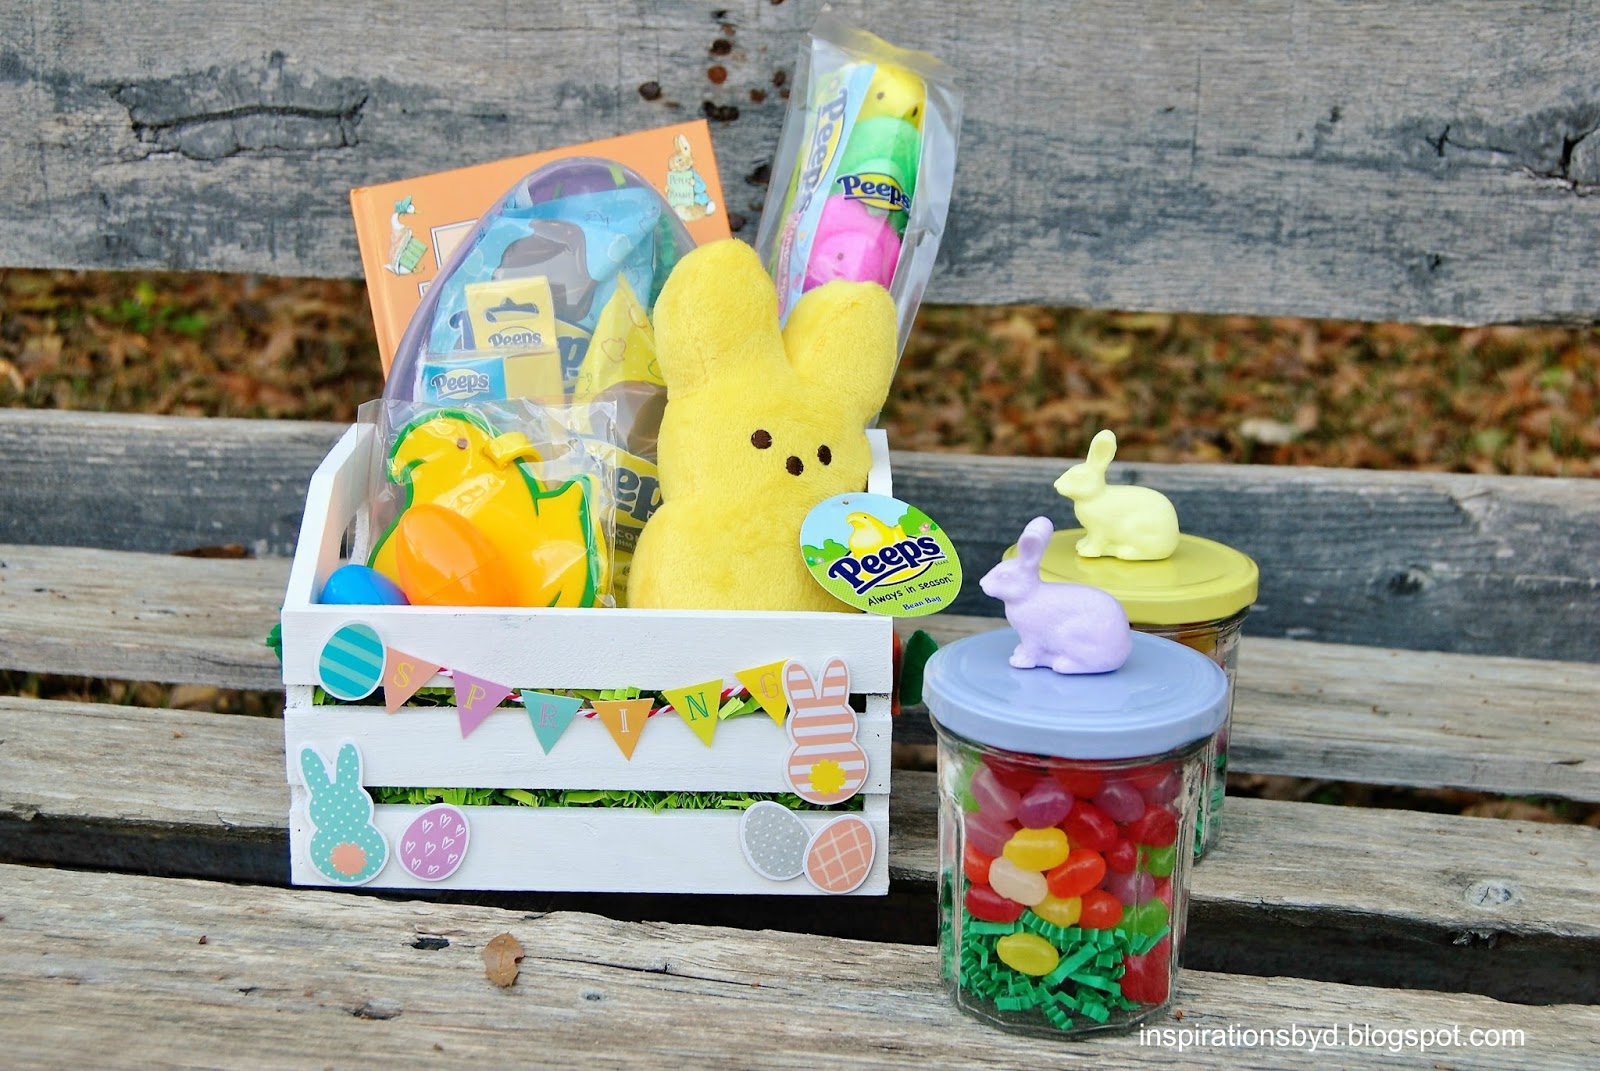
This year I used a light wooden basket along with the traditional Easter baskets to add a little theme.  I chose a farm/ shabby theme, so I painted the wooden basket with white craft paint and decorated my basket with Easter stickers and a tiny banner.


I chose a few of my child's favorite items from Peeps & Company, placed them in a large plastic Easter egg, then I used jars to fill them with the Peeps jelly beans and covered them with a decorative lid featuring bunnies.


There are numerous ways to celebrate using Peeps & Company, one of my favorite ideas are decorative Peeps marshmallows used to decorate cakes for Spring festivities.


For your Peeps & Company Easter, be sure to check them out and order your peeps favorites for your Easter baskets.  Peeps & Company will give all Inspirations by D readers 20% off on your purchase when you use code: EASTERTREATS at checkout.

I hope that you have a wonderful and blessed Easter and let me know which Peep & Company items you choose to fill your baskets with.


(Disclaimer)* I received Peeps & Company products for review. All opinions are solely mine and I have not received any monies for my opinion.

Easy Shrimp and Vegetables

Easy Shrimp and Vegetables
It's no secret that we love vegetables in our home, but what a great and refreshing 
way to add flavor, color, and texture to a dish by combining shrimp and vegetables. 
Did you know that by placing onions is the refrigerator you can avoid tearing up 
when chopping it?  Good to know for those of us that cook with lots of onions.
NOTE: For this recipe, you'll need to have your shrimp already cooked, so make 
sure you cook them before adding it to this dish.
In a pan add a tablespoon of olive oil,  add chopped garlic and cook until oil is hot.  
Add red onions, zucchini, and baby Bella mushrooms.  Make sure your mushrooms 
are rinsed.  Add salt and pepper to taste. While they cook for a minute, bring a pot of 
water to a boil, add 1/2 Tsp of salt to the water and add small potatoes.  I used 
a mixed bag of potatoes that contained, gold, red and blue/ purple small potatoes. 
Let it boil until tender.  Remove potatoes from heat and drain the water.  Set it aside.
recipe
After 2 minutes or so, add cooked shrimp to your vegetable mix.  Cook for another 
2 minutes make sure the vegetables are not overcooked but nice and tender.  
Then add your cooked potatoes to the mix.  Blend and serve.  You may add a side 
of corn on the cob and/ or avocado.
INGREDIENTS: (Serves 3)
1 Tablespoon Olive Oil
2 Cloves of Garlic.
1/2 Red onion
1 Zucchini
3 cups Baby Bella Mushrooms
1 Bag of Cooked Shrimp
1 Bag of Small Potato Mix
Salt & Pepper
I hope that you enjoy this tasty meal, it's easy and fast.  
If you don't like mushrooms or other veggies, just replace them 
with your favorite veggies. 
What I love about this, is that you can even put them on a stick and grill them, 
they make great kabobs too.
Happy Cooking!


Linking to:
Sunday's Best#38
BBQ Link Party/Censationalgirl

How to Make Sushi Rolls-(Re-Post)


I published this recipe in 2013 and it continues to be one of the hottest posts on this blog.
After I posted it, there have been several other blogs that have copied it or changed 
something in the recipe to make it their own.  I wanted to re-post it for those who 
missed it or for those that may be looking for something different to make for dinner.

It is one of our favorite things to eat, especially during Lent and summer.  
Today I will be sharing with you a simple sushi recipe that has no raw fish only imitation crab 
and the rest are veggies.  In the sushi world, we tend to call this a "California Roll".
www.inspirationsbyd.blogspot.com
To make this you will need:

Tip: Cover bamboo mat with plastic wrap to prevent rice form sticking to mat.
www.inspirationsbyd.blogspot.com
For instructions on making sushi rice click this link or here.
Making sushi rice is important to have good sushi.  It needs to be tasty and sticky to roll.
www.inspirationsbyd.blogspot.com
sushi
Add avocado too!
www.inspirationsbyd.blogspot.com
how to make sushi
www.inspirationsbyd.blogspot.com
inspirationsbyd.blogpost.com
Instructions:
  1. Cover bamboo mat with plastic wrap to prevent rice from sticking to it.
  2. Take out a sushi seaweed sheet and cut the sheet to make two smaller sheets. Tip: Using one full sheet will make your rolls too big. 
  3. Place the shiny side of the sea weed sheet faced down over your plastic wrapped bamboo mat.
  4. Wet your fingers to begin placing rice on top of the sheet. Tip: Wet fingers help prevent rice from sticking to your fingers.
  5. Cover sheet evenly and do not overload with rice. Tip: Do not press rice hard, you do not want to mash your rice.
  6. At this point, you may sprinkle sesame seeds over the rice, it adds flavor and texture.
  7. Turn your sushi & rice sheet over to the opposite side. (Don't worry, it won't fall off)
  8. Make sure your sheet is lined up with the edge of the bamboo mat for easy rolling.
  9. To this side of the sheet, add your veggies and crab meat.  Line them up evenly as seen above.
  10. Once you have your veggies in place, start rolling your sushi. Leave about an inch or so out of the end and tuck your sushi in as seen above, then finish rolling the whole sushi roll. (This helps prevent the sushi from falling apart).
  11. Tap the ends of the sushi so it is even and flat.
  12. Once you have your roll wet your knife and slice your roll into half.  
  13. Then cut your rolls about an inch and a half wide, one sushi roll will make 6 sushi rolls/bites.
  14. Repeat steps for more sushi rolls.
You may refrigerate them for company later or enjoy right away.
Happy Eats!

Linked to:
SITS Girls
I Should Be Mopping the Floor
Tutus and Tea Parties
The Frugal Girls
Jennifer Rizzo

DIY: Beeswax Candles


Today I wanted to share my experience in candle making.  I made small pillar 
candles out of 100 % beeswax in a couple of different colors.  
Beeswax candles produce negative ions, which cleanse the 
air of dust, odors, toxins, and pollens.  
They are completely non-toxic, non-allergenic and noncarcinogenic. 
With its healthful negative ions and warm, halo glow, they act like indoor air 
purifiers & they burn beautifully.  

The supplies that I used were the following:

- Square Braided Wick
- Aluminum mold (2 x 3) or desired size
- beeswax (I used a 1 lb. block- yields 4 candles)
(NOTE: Beeswax for Candle making come in blocks
 and Beeswax Pellets, also available in White Beeswax )
- Candle Dye Pigment
- cloth pin or pencil to hold the wick in place
- plastic plate or wax paper to protect working surface
- Metal bowl or Candle Making Pitcher
- a base for the mold to stand on leaving space in the center
- Wooden Craft Sticks for stirring
- scissors
- tape
- skewer stick
- pot
- water
- cooking spray

www.inspirationsbyd.blogspot.com

A) The first thing I did was measure the amount of wick that I was going to use, 
this ensures that you have enough wick for both ends.  Use a little cooking spray to spray 
the inside of the mold in order for the candle to slide out easily. Do not saturate. 
The mold has a hole in the closed end where you will pull the wick through. 

B) Make a knot leaving enough wick for the top of the candle. This end will be 
the top of the candle.
C) Take a piece of soft wax to seal that end making sure there are no leaks, then 
tape it off for extra support.
D) On the other side of the mold, pull the wick making sure it is secured.  Hold the 
wick up using the cloth pin until it is ready to have the wax poured inside of the mold. 
How to make beeswax candles

E) If you are using wax pellets, place them in the melting dish; if using a wax block, 
break it into pieces.  Make sure you measure the amount that you want to use.  
I used about 8oz.  Fill your pot about an inch deep of water.  You do not need to 
use too much water.  Place the pot over the burner and heat, do not boil.
Now place the bowl or whatever you are using to melt the wax in, on or in the pot.  
Observe and keep the heat low to moderate, watching the wax as it melts.  
Do not overheat.
F)  As soon as your wax is melted, turn the heat off and drop the color into the 
wax using a few drops. ( At this point you may also drop a scented oil if desired) 
Use the popsicle stick to stir the wax.  Make sure you have 
something to protect your hands from getting burned to handle the bowl.  
G) Before pouring your wax, make sure that the mold is steady, I used a plastic bag 
closure pin to keep my mold steady since the bottom has a bump due to the sealant.
H) Pour the wax very carefully, it is HOT.

www.inspirationsbyd.blogspot.com

I) Now secure the wick so it is centered using the cloth pin.
J) Wait for the wax to cool, make sure you have a disposable plate or wax paper 
underneath for any leaks. 
K-L) Wait for the wax to solidify for about an hour or so.

www.inspirationsbyd.blogspot.com
M) After an hour or so, take a skewer and poke holes into the wax to get rid of 
any air bubbles.
N) Let it cool for a couple of hours. then top it off with more melted wax.
O-P)  Let it cool for several hours or leave it overnight.

www.inspirationsbyd.blogspot.com
When the wax is completely solidified and the outside is cool to the touch, remove 
the cloth pin.
Grip the mold and turn it over to remove the tape and piece of wax at the end.  
Untie the knot.
Hold the mold upside down for the candle to slide out, if it doesn't come right out, 
you can put it in the freezer for a minute or two and try again.  You may have to 
squeeze the mold a bit to loosen candle, then it should come out.  Cut the excess wick 
on the bottom end of the candle.
www.inspirationsbyd.blogspot.com

In order for the candle to stand straight, you will have to level it. There are a number 
of ways to level the candle so it stands up straight. One easy way is to heat an old 
frying pan or cookie sheet and slowly rub the base of the candle over the heated surface 
until the bottom is flat.  As a final step cut the top wick to a 1/4 inch until ready for use.
www.inspirationsbyd.blogspot.com
Enjoy your candle!


Mobile Photography

(Disclaimer) *This post may contain affiliate links and I may be compensated if a purchase is made by clicking my links.
Mobile Photography: Perfect Photos in Your Pocket

During this time of year, we tend to snap many photos of people we that we love, places we visit, seasonal decorations or just beautiful scenes for blogging and social media.  Sometimes I don't carry my DSL with me and so I am left to shoot pictures with my phone.  The problem?  Sometimes the photos are not as crisp as I'd like them to be.  Do you ever have that problem?  

On my phone, the photos look great, but when I load them to my computer, they're terrible.  So here is a solution, Craftsy!  They are currently offering a course on how to make the most of your smartphone camera, whether Android™ or iPhone® and to go beyond basic settings, take impressive photographs and add incredible post-production effects.  Most photo opportunities don't wait for you to grab your camera — so reach in your pocket and get great results regardless!   Doesn't that sound great?  

Perhaps you know of someone that would enjoy taking a class with Craftsy and if you do, how about offering the class as a gift!  You will enjoy taking any course since it is set to go at your own pace.  

Drop by the Craftsy site by clicking the links on this post and learn more about their classes and prepare for awesome pictures on your phone. 

Enjoy!


Pin It button on image hover